Thursday 13 September 2018

Shutter Speed, ISO And Aperture

Shutter Speed:
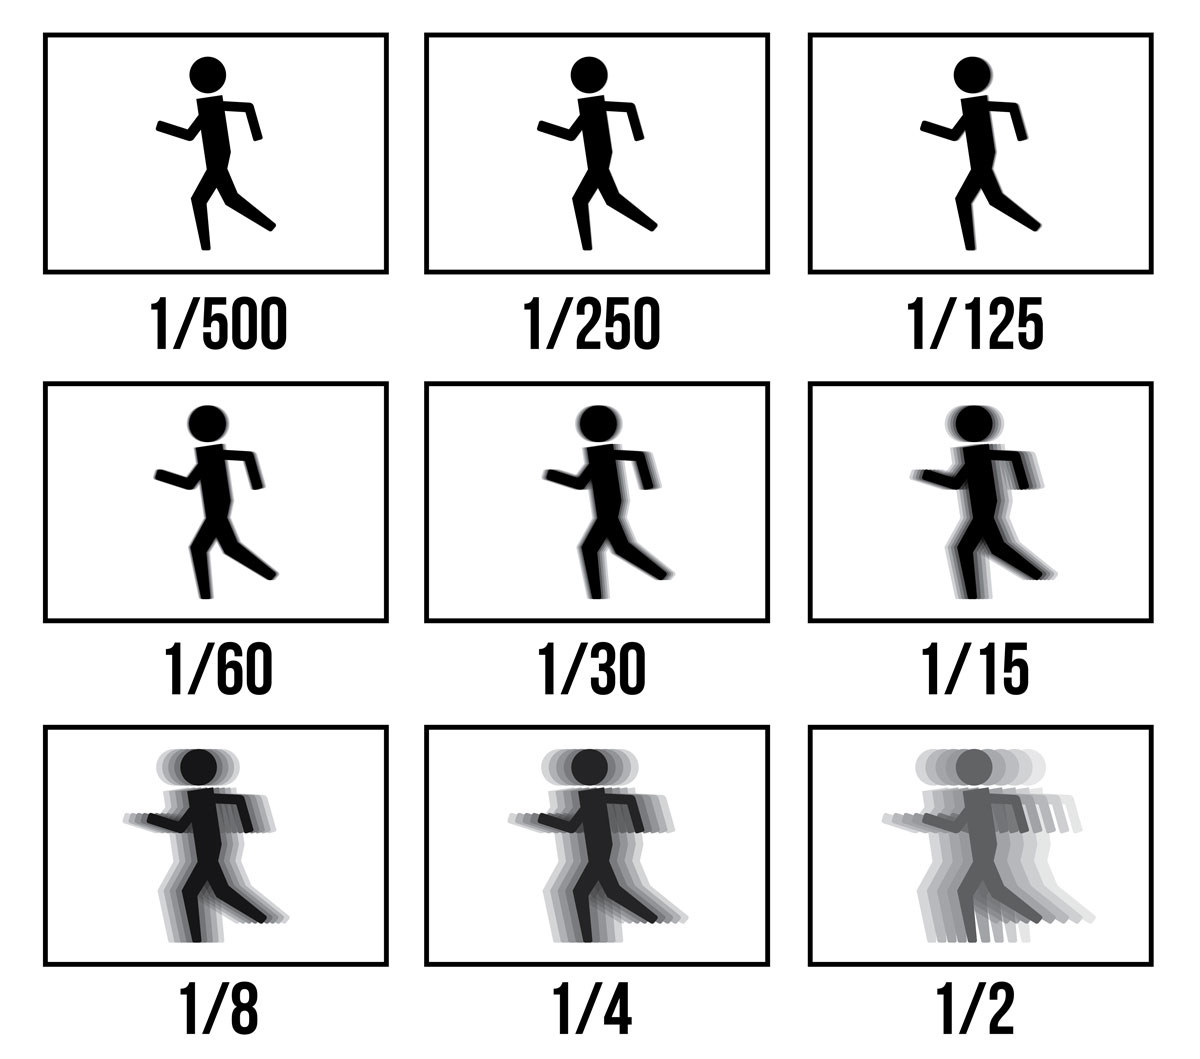
Shutter speed is the length of time your camera shutter is open for, exposing light onto the camera sensor.
When you use a long shutter speed, you end up exposing your sensor for a significant period of time. The first big effect of shutter speed is motion blur. If your shutter speed is long, moving subjects in your photo/video will appear blurred along with the direction of motion.

Image result for what is shutter speed

ISO:
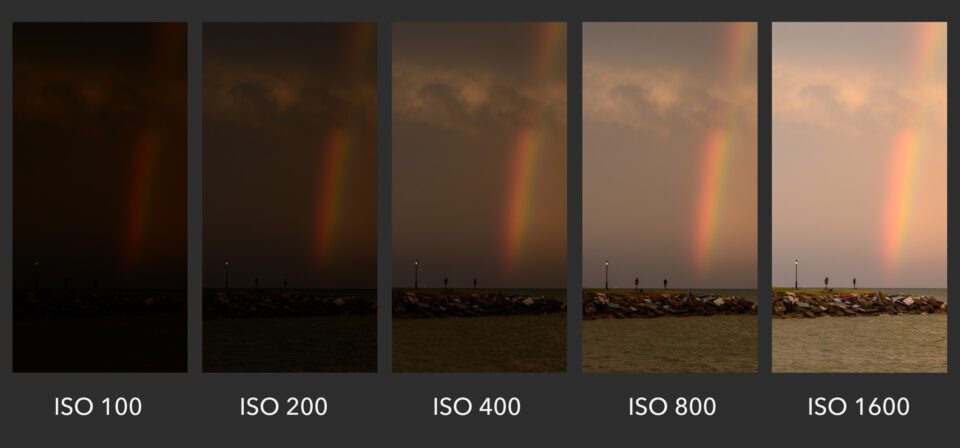
In very basic terms, ISO is simply a camera setting that will brighten or darken a photo. As you increase your ISO number, your photos will grow progressively brighter. For that reason, ISO is a good tool to help you capture images in dark environments or be more flexible about your aperture and shutter speed settings.

However, raising your ISO has consequences. A photo taken at too high of an ISO will show a lot of grain, also known as noise, and might not be usable. So, brightening a photo via ISO is always a trade-off. You should only raise your ISO when you are unable to brighten the photo via shutter speed or aperture instead (for example, if using a longer shutter speed would cause your subject to be blurry).


ISO Brightness Chart

Aperture:
Aperture is a hole within a lens, through which light travels into the camera body. It is an easy concept to understand if you just think about how your eyes work. As you move between bright and dark environments, the iris in your eyes either expands or shrinks, controlling the size of your pupil. In photography, the “pupil” of your lens is called your aperture. You can shrink or enlarge the size of the aperture to allow more or less light to reach your camera sensor.

Aperture has several effects on your photographs. One of the most important is the brightness, or exposure, of your images. As aperture changes in size, it alters the overall amount of light that reaches your camera sensor – and therefore the brightness of your image. A large aperture (a wide opening) will pass a lot of light, resulting in a brighter photograph. A small aperture does just the opposite, making a photo darker.

The other critical effect of aperture is something known as depth of field. The depth of field is the amount of your photograph that appears sharp from front to back. Some images have a “thin” or “shallow” depth of field, where the background is completely out of focus. Other images have a “large” or “deep” depth of field, where both the foreground and background are sharp.

Image result for what is aperture


My first outdoors attempt. Doing a pull focus shot starting from the left wall and finishing on the roof to the right. ISO of 400 due to the shade and a smaller aperture to allow less light on from the wall and roof.
These next to videos are another pull focus in the graveyard. I feel as the videos are overexposed and more grainy with the 400 ISO but also went underexposed with a 200 ISO and I found it difficult to focus from the front grave to the back due to the change in light.


These next two videos are of the same angle but the first is overexposed with a 1600 ISO and the second is underexposed with a 400 ISO. I personally prefer the second video as the low ISO gives the video low-key lighting and has more of a horror effect to it.

The results of this experiment were as expected. The camera shutter speed at 1/30 had more motion blur than the one at 1/250. The only thing I would have changed is for the last train to be going at the same speed as the first two for a more fair comparison.


As you can tell this video is massively underexposed due to the low ISO with extremely poor lighting as I was using indoor lights as my video lighting

With the ISO of 1600, the wall is more visible but the with the light being indoors, the inside of the building starts to become washed out with the light.

This is outside with the camera facing away from the building. Anything below 1600 was pure black on the screen. the best result came from the ISO at 6400 but the video became grainy. To help resolve this issue I would have used better lighting with a lower ISO

With the F stop at 16, the subject (the bench) is in focus where the background (the wall and trees) are slightly out of focus so the depth of field is relatively shallow
With the F stop at 22 everything in this shot is in focus as the depth of field is deep. However, the subjects light exposure is a lot less than the backgrounds causing the subject to be much darker and a little grainy. This could be fixed with a light source aimed at the subject to help balance out this light exposure

With the F stop at 4 (the lens wouldn't go down to 2.8), the subject is clearly in focus whereas the background is entirely blurred out with just smudges of the colours blending together.

No comments:

Post a Comment

Editing Evaluation

Video evaluation on editing