Showing posts with label Unit 30 - Camera and Lighting Techniques. Show all posts

Monday, 12 November 2018

New Wave Film, Brief And Evaluation


Brief:

From the research of my contextual studies of American New Wave, I've noticed that the main focus of their techniques is to break the rules of what then was traditional Hollywood cinema. The way they break the rules includes, handheld cameras; lack of/improvised narrative (or one that makes little sense); lots of jumpcuts; long cuts that continue even after the main focus has gone off screen; unusual camera angles; natural lighting; and non-actors.

For my own new wave film, I want to take the unusual camera angles and bring it into the spotlight with the entire film being recorded from a POV (point of view) shot. By doing this I could create a behind the scenes film where it shows a day in the life of a new wave filmmaker as he gets up, does his morning routine, meets his friends and they make a new wave film. I also want to add in shots of the person looking into a mirror holding the camera to remind you that you're watching a film (breaking the 4th wall). During editing, I want to create the morning routine into a montage with lots of continuous jump cuts almost enough to disorientate the viewer. For the audio and lighting, I want it to be all diegetic and natural to give a sense of realism.

Evaluation:
Due to the weather and confusion of meeting points, I managed to get my morning routine shoot sorted but the recording of the fake new wave film, unfortunately, didn't happen but recorded most of the day all from a POV shot and ended up with 40 minutes worth of footage that needed to be taken down to about 2 minutes. I took this into consideration and made my entire film into a montage of the day with a lot of fast-paced editing unless there was dialogue in there I wanted the viewer to hear. Even though my contextual studies were based on the American new wave, my film had more influence from the French new wave, with the black and white and French writing. I added those French title cards in as partially a little in-joke but as well to openly reference the fact the film isn't perfect and has mistakes. The title cards translate to "missing images" and "SD card full" this was due to the fact some clips I felt were unusable or took up too much time so they were "missing images" and my SD became full at the end of the day which is why I stopped recording otherwise I would have gotten a home routine recorded too. After I edited my video I got some feedback and everyone felt like I could add something else to make it more disorientating. So I rendered my footage and revered it, lowered the opacity, panned the revered audio left and the original audio right. this created a more disorientating effect especially when the audio starts to sink up in the middle of the film making it more chaotic and with headphones on, gives the viewer a tingling sensation throughout.      


Sunday, 28 October 2018

Health And Safety

Studio Health And Safety

Image result for no food or drink sign
Image result for warning hot surface do not touchWhen using the studio it is extremely important to follow correct health and safety procedures to prevent any damage to yourself and equipment.

When using the studio you need to ensure that all doorways and emergency exits are marked clearly and are not obstructed.

Image result for small photography studioMake sure no food or drink is in the studio at any time. This is to prevent any from being split as it can damage equipment, cause electric shocks or cause a potential slip hazard which could lead to injury to yourself and damage to the equipment if you were to fall onto it.

Make sure all wires are secured neatly away (no lose/hanging wires) as this could lead to tripping over wires, unplugging them, electrocution or even having wires tangle around your neck. 

Keep hands away from the bulbs as they get very hot and could cause burns.

Be careful when lifting heavy equipment, always have someone to help you.

Only people that are needed in the studio should be in there, this is due to the studio being a confined area and other not knowing the correct procedures of the studio could cause injury to others or damage to the equipment


Monday, 8 October 2018

4 Hour Film Challenge - Unusual Perspective


The brief for this 4 hour film challenge was that we had to use an usual perspective. We came up with two ideas to chose from, an usual perspective on men where would interview woman about the "typical male" and then over exaggerate what they say through acting. Our second idea was to record from the perspective of a pesky wasp that kept following us through out the day/our trip into town.

This idea left us with the freedom of camera angles to be whatever we wanted as wasps are able to fly which let us use a handheld camera and let it be shaky and in obscure angles. During editing I tried to have a fly eye effect on all of the shots but I couldn't find a tutorial but I still wanted the shots to be distorted in a way so I used the warping tools to create a weird effect across the screen that humans wouldn't see naturally. The issue with recording outside were that some shots changed from being over to under exposed to due to moving in and out of the shade on a bright day. I also added a "voice over" to the wasp which was me saying "buzz" in many different tones and lengths which is what many people said had "made the video". During group crit it was said that this could have been improved by adding subtitles to what the wasp was saying and also having a scene where the wasp was bouncing off of a window trying to get outside. But Billy said and I quote "I don't know if this is shit or genius"

Friday, 5 October 2018

4 Hour Film Challenge - Doors And Match On Action


The brief we were given for this 4 hour film challenge was that we had to use a door and match on action shots. This could be as simple as someone walking through a door, recording it from two different angles and then matching up the angles in editing to have the person seamlessly walk through the door.

Our initial ideas ranged from someone changing moods every time they walked through a door, to every time they walked through a door they ended up in a different locations. We scrapped these ideas as they would be too time consuming. We finally all agreed on to have someone who has no idea how doors worked as this would be easy to film as well as comedic. When location scouting, we wanted somewhere with a glass door so we could see all angles on the action no matter what side of the door we were on. We also wanted a long corridor for the actors to have a long run up for the door as well as to be able to have a wide range of camera shots and angles to choose from. The idea for it to become a silent film was a happy accident due to the lack of dialogue we could think of for this short film. Although this worked out in editing, during group critic we were told the pass of the editing could have picked up as the film went on just like it would in the short films, they would walk unusually fast because the tapes were sped up which would have helped with our comedic approach.

I was proud of a lot of the camera angles, the rule of thirds and double framing. The only issues discussed within the group critic were that a couple of the match on action shots could have been tightened up a tiny bit more and the intro shots were slightly out of focus. One the I picked up on myself was the framing of when I have the door hit me in the face whilst opening it. The camera should have been aimed down a little lower or zoomed out a bit more as my head was coming of the bottom of the shot.

Wednesday, 26 September 2018

Why Lighting Effects Camera Techniques For Moving Image

Lighting is what can make or break a film. Without the correct use of lighting the shots could be under/cover exposed or not portray the correct meaning the shot was originally meant to give. There are handful of different lighting techniques such as "hard/soft lighting", "warm/cool lighting" and low/high-key lighting"
                                                                                     

Hard lighting is created from a single narrow light source. This creates a hard edge on the shadow giving the shadow a clear shape. Hard lighting is great for creating silhouettes for noir films which have a heavy use of shadows to create meaning in their shots. e.g. the use of hard light through venetian blinds to cast the shadows onto walls and actors.   


Soft lighting created from several lightings being directed at the subject/set. This creates softer shadows that have more of a fuzz as they blend into the light with a gradient effect. Soft lighting is often used as a fill lighting as it creates little shadows and would be commonly found it sit coms that have a brighter feel to the set.


Using lights of different colour temperatures in film means using lights of different colour in the same shot. As seen in this image below, this has been excellently used by Dr. James Cameron in "Terminator 2" where he mixed the blue and orange as in this scene the terminator is being hit by lights from moonlight (blue) and molten steal (orange). the only issue with mixing colours like this as it's not really possible to change the definition of one light without also effecting the other.

Tuesday, 18 September 2018

Lighting


Edge Lighting is commonly found in the studio as well as lots of films, famously in Noir. This technique is used to create a subtle or an obvious "edge" of light on the subject, usually split down the middle of the subject but for magazines and photo shoots it's used have light edge along the jawline.

This is a really simple and easy lighting to do. 90 degrees from the subject to create a shadow on one side of the face and light on the other creating a "split" or "edge" of light on the subject.

Rembrandt Lighting is highly used in studios. This lighting can be achieved in two ways. You can use a single light and a reflector or by using two lights but at different settings and angles (which is what I have done). This technique is popular in the studios because it produces images which appear both natural and fascinating with little equipment

This lighting is hard to achieve, I didn't get the full triangle under the eye. To solve this, I could have spent more time carefully moving the light and subject to achieve the correct lighting.

Butterfly Lighting is one of the oldest techniques for lighting the face of a subject. This technique got its name from the butterfly-shaped shadow it creates under the subject's nose as well giving more definition to the subjects cheekbones.

This lighting was one of the easiest to achieve however the lights weren't able to go up high enough to fully achieve the right lighting and harsh shadows under the nose. To fix this, I would have a light I can move higher up or lower my subject more.

This experimental lighting with the light directly under the subject created harsh shadows over his face with the lights hitting the lower parts of his face and just above his eyes.

Thuis lighting created a more extreme split effect with more of his face cover with the shadow.

This was my favourite lighting as it created a very ominous silhouette of the subject and creating a "heavenly" glow from behind him shinning through his hair.

The issue with this low key lighting is the ISO being high creating a grainy video.

This high key lighting is very easy to create due to the fact it's just natural light. The only issue is with natural light is depending on the weather and time of day, the lighting may not stay consistent and shots may look different in shoots. To solve this I'd take out a light source of my own, a diffuser and reflector to keep the lighting outside consistent.

Friday, 14 September 2018

Suggested Lighting Equipment And Set Ups

A small documentary where portability is paramount - Sun light, ring light attached to the camera, small box lights

All of this equipment is small and light making it easy to carry around as you move from location to location for said documentary. The ring light attached to the camera will help keep areas in front of the camera well lit and the small box lights will help light up more shaded areas the the sun can't reach. The only issue with the sun on a bright day is as you move from shade into sun light it can make keeping the light exposure levels consistent and can cause people on screen to squint. to help resolve this, you could either keep to shaded areas, have the people on camera face side on from the sun so they don't squint or plan ahead and shoot on a cloudy day or when the sun is at a high point in the sky which would keep the lighting consistent and away from eyes.

Talking head style interview - Full studio soft box lighting kit -

This lighting is what is used in the majority of head style interviews as the subject usually stays in the same spot. This will mean you wouldn't have to move heavy equipment around and the lighting and exposure levels would stay consistent throughout the shoot.

A night time shoot - Natural lighting (cities) and ring lights.

I would choose this equipment for a night time shoot as the ring lights will help keep what's in front of the camera stay well light in dark areas whilst also keeping the "night time feel". I would also use natural lighting from the cities as unless you're walking around into unlit areas at night the exposure levels and lighting would stay fairly consistent throughout the shoot.

Thursday, 13 September 2018

Shutter Speed, ISO And Aperture

Shutter Speed:
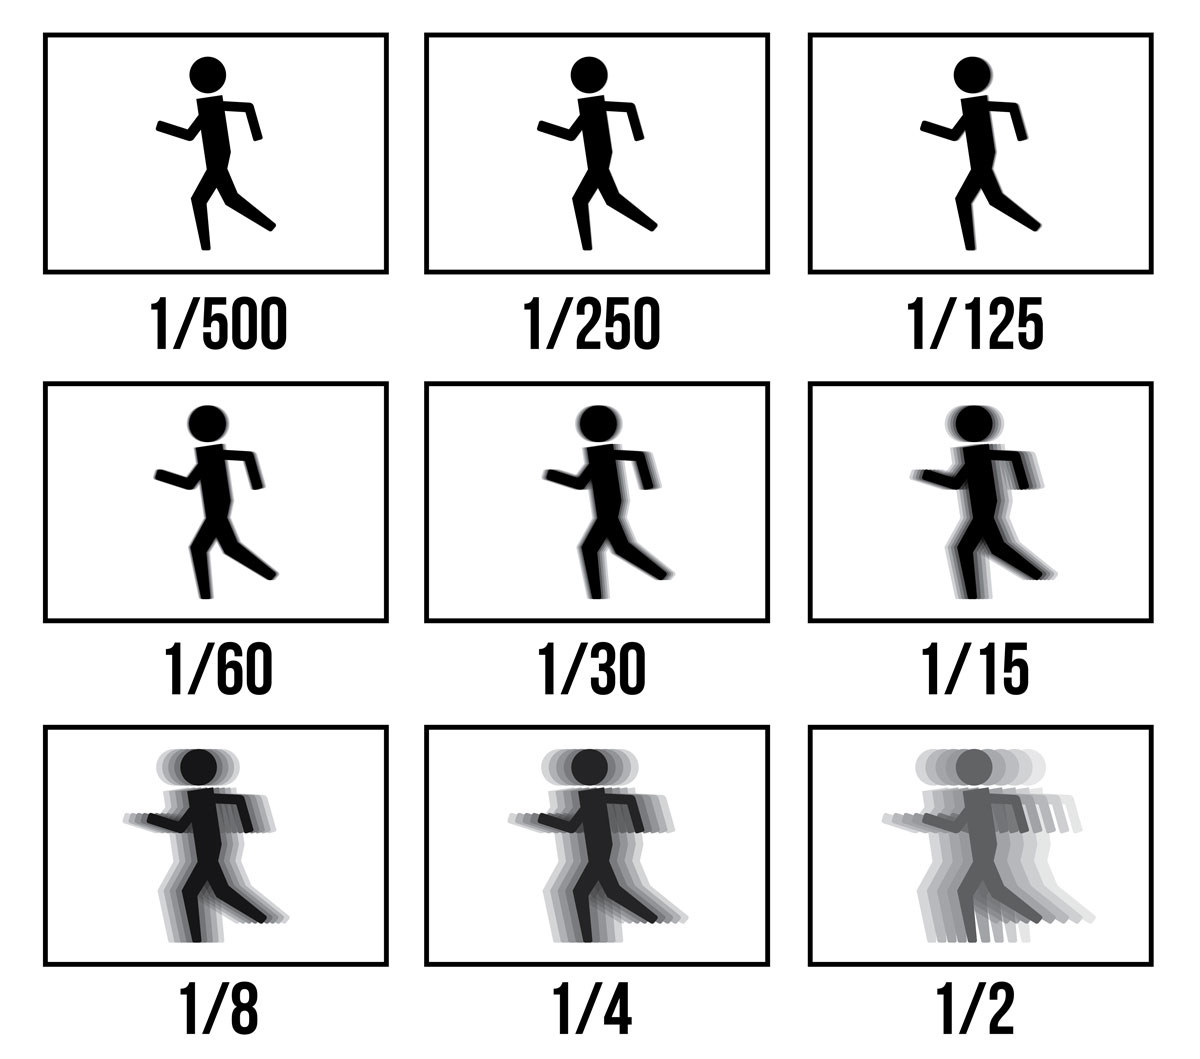
Shutter speed is the length of time your camera shutter is open for, exposing light onto the camera sensor.
When you use a long shutter speed, you end up exposing your sensor for a significant period of time. The first big effect of shutter speed is motion blur. If your shutter speed is long, moving subjects in your photo/video will appear blurred along with the direction of motion.

Image result for what is shutter speed

ISO:
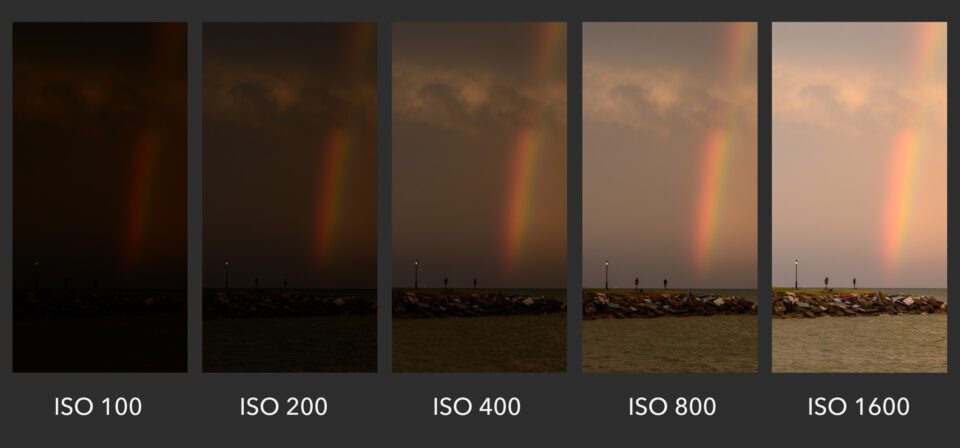
In very basic terms, ISO is simply a camera setting that will brighten or darken a photo. As you increase your ISO number, your photos will grow progressively brighter. For that reason, ISO is a good tool to help you capture images in dark environments or be more flexible about your aperture and shutter speed settings.

However, raising your ISO has consequences. A photo taken at too high of an ISO will show a lot of grain, also known as noise, and might not be usable. So, brightening a photo via ISO is always a trade-off. You should only raise your ISO when you are unable to brighten the photo via shutter speed or aperture instead (for example, if using a longer shutter speed would cause your subject to be blurry).


ISO Brightness Chart

Aperture:
Aperture is a hole within a lens, through which light travels into the camera body. It is an easy concept to understand if you just think about how your eyes work. As you move between bright and dark environments, the iris in your eyes either expands or shrinks, controlling the size of your pupil. In photography, the “pupil” of your lens is called your aperture. You can shrink or enlarge the size of the aperture to allow more or less light to reach your camera sensor.

Aperture has several effects on your photographs. One of the most important is the brightness, or exposure, of your images. As aperture changes in size, it alters the overall amount of light that reaches your camera sensor – and therefore the brightness of your image. A large aperture (a wide opening) will pass a lot of light, resulting in a brighter photograph. A small aperture does just the opposite, making a photo darker.

The other critical effect of aperture is something known as depth of field. The depth of field is the amount of your photograph that appears sharp from front to back. Some images have a “thin” or “shallow” depth of field, where the background is completely out of focus. Other images have a “large” or “deep” depth of field, where both the foreground and background are sharp.

Image result for what is aperture


My first outdoors attempt. Doing a pull focus shot starting from the left wall and finishing on the roof to the right. ISO of 400 due to the shade and a smaller aperture to allow less light on from the wall and roof.
These next to videos are another pull focus in the graveyard. I feel as the videos are overexposed and more grainy with the 400 ISO but also went underexposed with a 200 ISO and I found it difficult to focus from the front grave to the back due to the change in light.


These next two videos are of the same angle but the first is overexposed with a 1600 ISO and the second is underexposed with a 400 ISO. I personally prefer the second video as the low ISO gives the video low-key lighting and has more of a horror effect to it.

The results of this experiment were as expected. The camera shutter speed at 1/30 had more motion blur than the one at 1/250. The only thing I would have changed is for the last train to be going at the same speed as the first two for a more fair comparison.


As you can tell this video is massively underexposed due to the low ISO with extremely poor lighting as I was using indoor lights as my video lighting

With the ISO of 1600, the wall is more visible but the with the light being indoors, the inside of the building starts to become washed out with the light.

This is outside with the camera facing away from the building. Anything below 1600 was pure black on the screen. the best result came from the ISO at 6400 but the video became grainy. To help resolve this issue I would have used better lighting with a lower ISO

With the F stop at 16, the subject (the bench) is in focus where the background (the wall and trees) are slightly out of focus so the depth of field is relatively shallow
With the F stop at 22 everything in this shot is in focus as the depth of field is deep. However, the subjects light exposure is a lot less than the backgrounds causing the subject to be much darker and a little grainy. This could be fixed with a light source aimed at the subject to help balance out this light exposure

With the F stop at 4 (the lens wouldn't go down to 2.8), the subject is clearly in focus whereas the background is entirely blurred out with just smudges of the colours blending together.

Wednesday, 12 September 2018

Easy Rider Analysis


The scene starts with a medium four shot of the group - 2 men and 2 women all late 20s early 30s. This scene was shot with a 16mm camera giving it a grainy dirty look. This depicts the grubby lifestyle and situation they are currently in, drinking, smoking and taking acid in a cemetery. This scene is heavily accompanied by the sound of machinery making their dialogue almost inaudible. This scene is shot in a linear style with the same camera angle until the group take the acid tabs. Once their acid tabs settle into their systems we cut to a low angle shot of an old rundown build with the hand half camera slowly panning from left to right soaking the scene in lens flairs as a religious speaker talks about heaven. Heaven is usually depicted as a blinding white light when you die which matched the lens flairs and dialogue on in this scene. During this highly experimental stage, the director and camera crew begin to break standard filming rules that were set during the time of their filming like zooming directly into the sun. This is all done to remind the audience their watching a film rather than immersing them into it. The use of relatively fast pace editing, the non linear scenes going forward and backwards in time repeatedly within a small amount of time is supposed to represent the acid trip the group is on and give the audience the confusion and the disturbance of this acid trip that the group themselves would feel. As the cast of this production actually took acid for this scene everything that happens in unscripted making this acid trip and the actions of the cast that more authentic.

Editing Evaluation

Video evaluation on editing